Building Discord Bot with AWS Serverless - Part 1

This blog post is part of the Let's Build Series, where we pick and build an idea.
In this 3 part blog series, we will be building a Discord bot that fetches the recently posted blogs from the AWS blog space. We will build this with AWS Lambda as the backend to run the commands and AWS API Gateway to send a request to our Lambda.
The biggest advantage of building this as, serverless is that you don't have to manage any server and you will have to pay only for what you use. If you are using AWS Free Tier, it's going to be mostly free of cost or minimal cost (due to the use of AWS Secrets Manager).
Motivation: The motivation to create such a bot is that I love to stay up to date with AWS Services and learn new solution implementations. The best way to achieve this is AWS Blogs. Getting all the latest published blogs in one place saves time.
This simple architecture can be used/extended to build any Discord Bot running on AWS Serverless. Just depends on what your command wants to achieve can go in Execute Commands Lambda. In my case, it's fetching AWS Blogs.
Alrighty then, let's begin by looking into the architecture that we will be building:
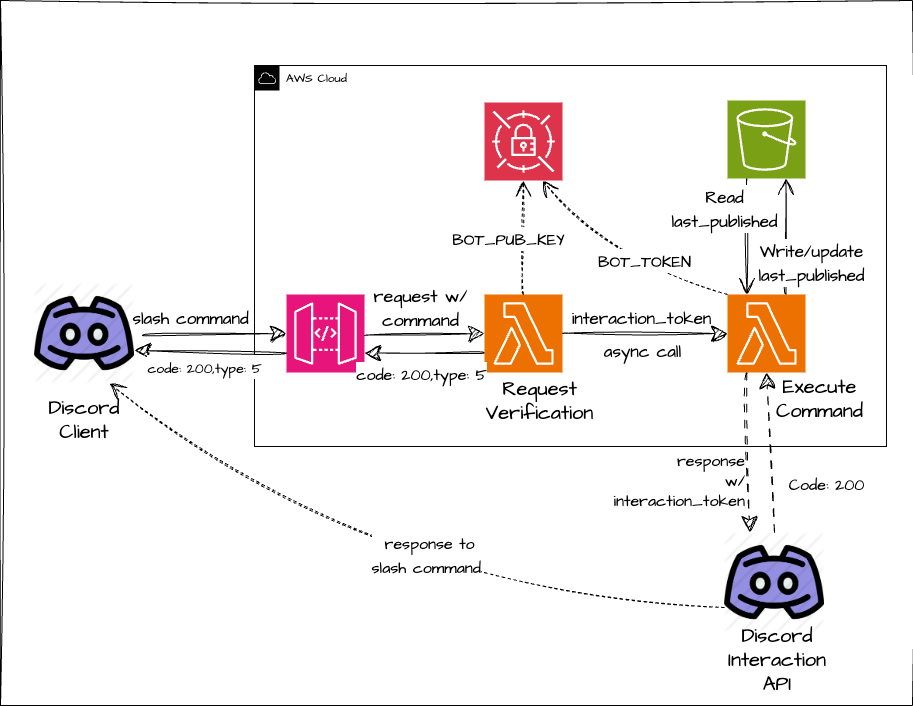
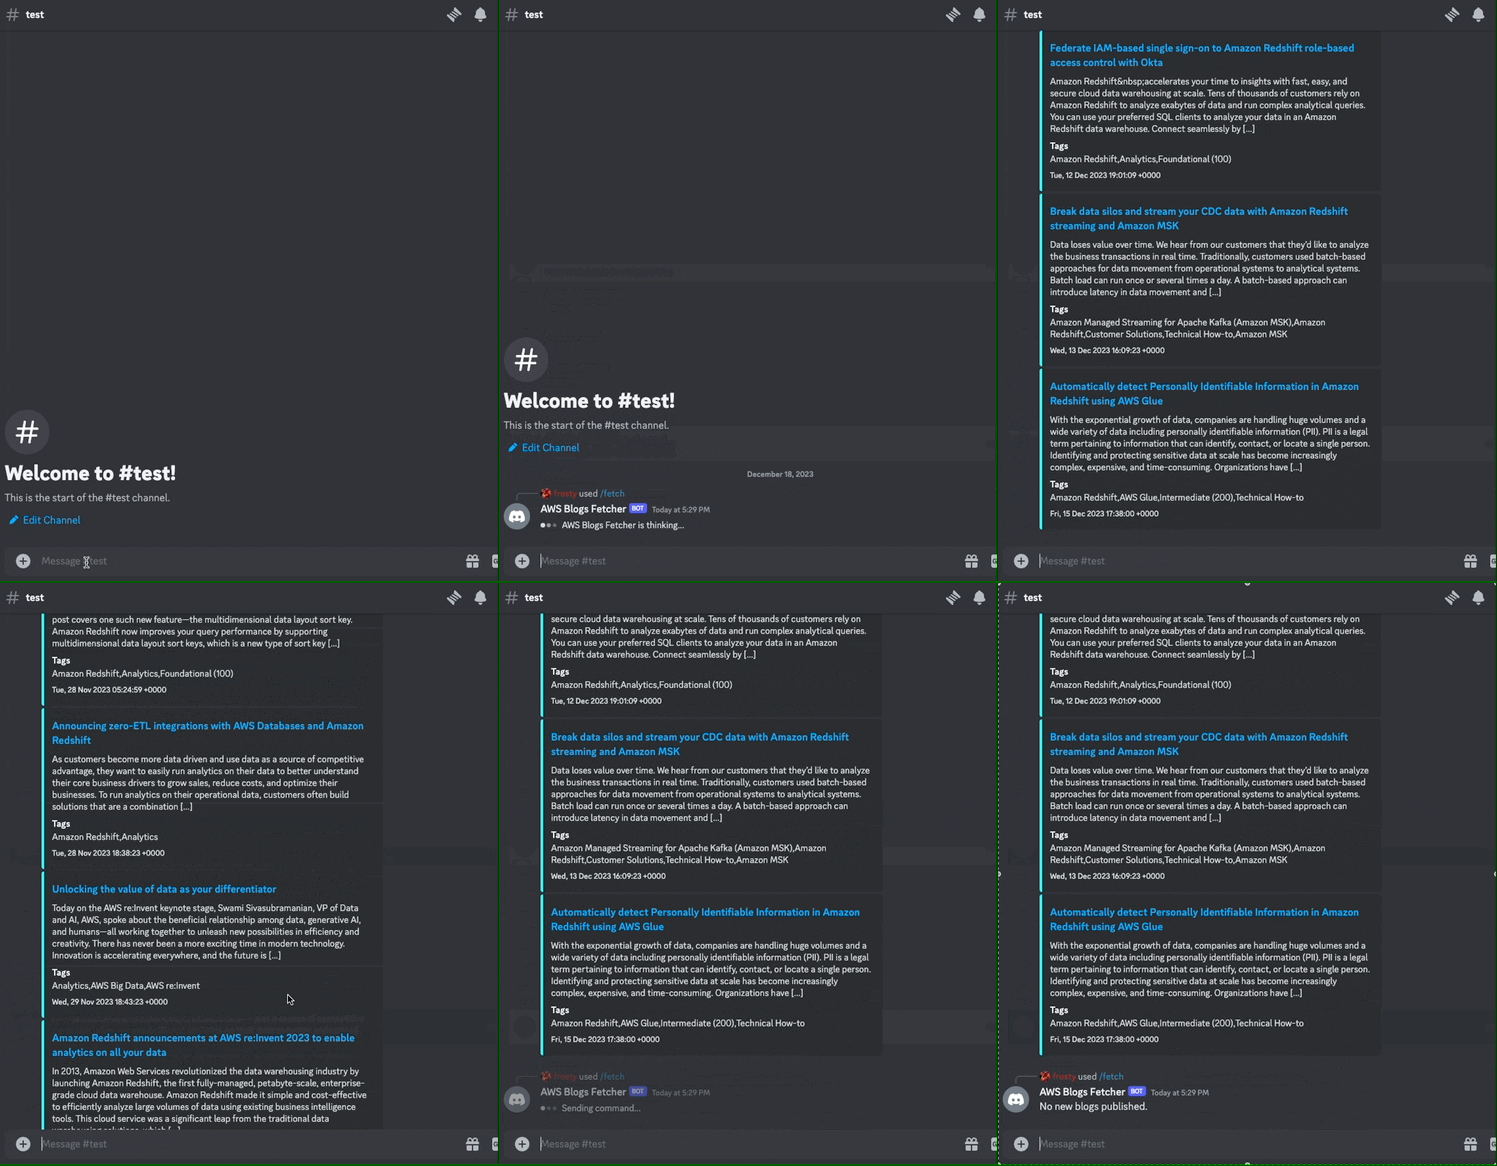
- Discord Client: This is the discord application either running on mobile/laptop or your browser.
- API Gateway: This will be the entry point that will send the command and the request for execution of a slash command.
- Request Verification Lambda: Lambda function to verify that the request is originally being sent via Discord servers by validating the signature and timestamp of the headers of the request. We will look more into this later in the post.
- Command Execution Lambda: Lambda function that is being invoked asynchronously from verification lambda if the sent request is validated.
- Secrets Manager: To store BOT_PUBLIC_KEY and BOT_TOKEN. This is highly recommended to store in AWS Secrets Manager so these can't be accessed publically and your bot remains secure.
- S3 Bucket: To store the last published timestamp, so that you always get the recently published blogs and not all the entries. Another alternative to this is a DynamoDB table.
Things to know before start building:
- Application command needs to be registered with the bot before using them.
- Discord Interaction: An Interaction is the message that your application receives when a user uses an application command
interaction_tokenis the unique token for the interaction received from the application command.- Interaction
tokensare valid for 15 minutes and can be used to send follow-up messages but you must send an initial response within 3 seconds of receiving the event. If the 3-second deadline is exceeded, the token will be invalidated.
Getting Started:
Before we start into things, I am assuming that you have a Discord application/bot already created from the Discord Developers Portal, and if you are new to this you can just go here and create a Discord Application/Bot within a few clicks and follow Getting Started to add it in your Discord Server.
Request Verification:
One of the most important things, before building a Discord Bot is to understand how Discord authenticates an endpoint and how the same can be achieved in our VerifyRequest Lambda Function.
This is a crucial step to make sure that you are only processing the requests coming via the original Discord Gateway and is not a phishing request.
Every interaction request is sent with the following headers:
X-Signature-Ed25519as a signatureX-Signature-Timestampas a timestamp
We must validate the request each time we receive an interaction. If the signature fails validation, respond with a 401 error code.
To validate an interaction request, discord-interactions python package can be used as it provides a method called verify_key. This verify_key method already contains the logic for request validation for us.
Let's write a Python function that can be used later in our VerifyRequest Lambda function.
from discord_interactions import verify_key

def verify_event(event):
    # Will be read from AWS Secrets Manager
    discord_public_key = "BOT_PUBLIC_KEY"

    raw_body = event["body"]
    headers = event["headers"]
    signature = headers["x-signature-ed25519"]
    timestamp = headers["x-signature-timestamp"]

    # Verify if the request is valid
    is_verified = verify_key(
        raw_body.encode(), signature, timestamp, discord_public_key
    )
    print("Event Verification Status:", is_verified)
    return is_verified
This is it for Part 1, in the next iterations i.e. Part 2, we will build the VerifyRequest Lambda function along with an AWS API Gateway, and in Part 3, we will implement ExecuteCommand Lambda function and stitch everything together and create a fully functional bot.
If you have read until here, please leave a comment below, and any feedback is highly appreciated. See you in the next post..!!! 😊


Member discussion