Building Discord Bot with AWS Serverless - Part 2

This blog post is part of the Let's Build Series, where we pick and build an idea.
In the inaugural blog post of this Series, we looked into what we are building and why we are building, things to know before building, and discussed how request verification works.

Registering Command with Discord Bot
To use any command within your discord server, it needs to be registered first with your bot. This can be implemented in a Lambda function with a trigger on an S3 PUT Object event but I have chosen to run directly via workstation. But as we are building it entirely on AWS we will create a Lambda Function for the same that will be triggered based on an S3 event.
To register a command, a call to Discord register command API needs to be made from your lambda. 2 endpoints can be used for the registering commands based on whether you want to register it only for a bot in a specific Discord server or globally.
Let's create a config file first to make it easier to register multiple commands at once, in this case, /hello and /fetch command for the bot:
- name: hello
  description: Say hello!

- name: fetch
  description: Fetches blog posts from big data blog
  options:
    - name: message
      description: The name of the blog to fetch from.
      type: 3 # string
      required: true
discord_commands.yaml
import requests
import yaml

# Read from Secrets Manager if it's defined as Lambda Function
TOKEN = "INSERT YOUR BOT TOKEN HERE"
APPLICATION_ID = "INSERT_APPLICATION_ID_HERE"

# If you want to register command globally for bot in all servers, use this URL.
# URL = f"https://discord.com/api/v9/applications/{APPLICATION_ID}/commands"

# If you want to register command only in a specific guild/server, use this URL.
GUILD_ID = "INSERT YOUR GUILD/SERVER ID HERE"

# Guild URL
URL = f"https://discord.com/api/v10/applications/{APPLICATION_ID}/guilds/{GUILD_ID}/commands"


with open("discord_commands.yaml", "r", encoding="utf-8") as file:
    yaml_content = file.read()

commands = yaml.safe_load(yaml_content)
headers = {"Authorization": f"Bot {TOKEN}", "Content-Type": "application/json"}

# Send the POST request for each command
for command in commands:
    response = requests.post(URL, json=command, headers=headers)
    command_name = command["name"]
    if response.status_code != 200:
        print(response.text)
    else:
        print(f"Command {command_name} created: {response.status_code}")
register_commands.py
Once the execution for this is completed with status_code: 200, commands will be visible on Discord servers.

VerifyRequest Lambda Function
- What this Lambda will do?
- Verify the request, if it's valid or not by checking the headed signature.
- If a request is valid, return the response with
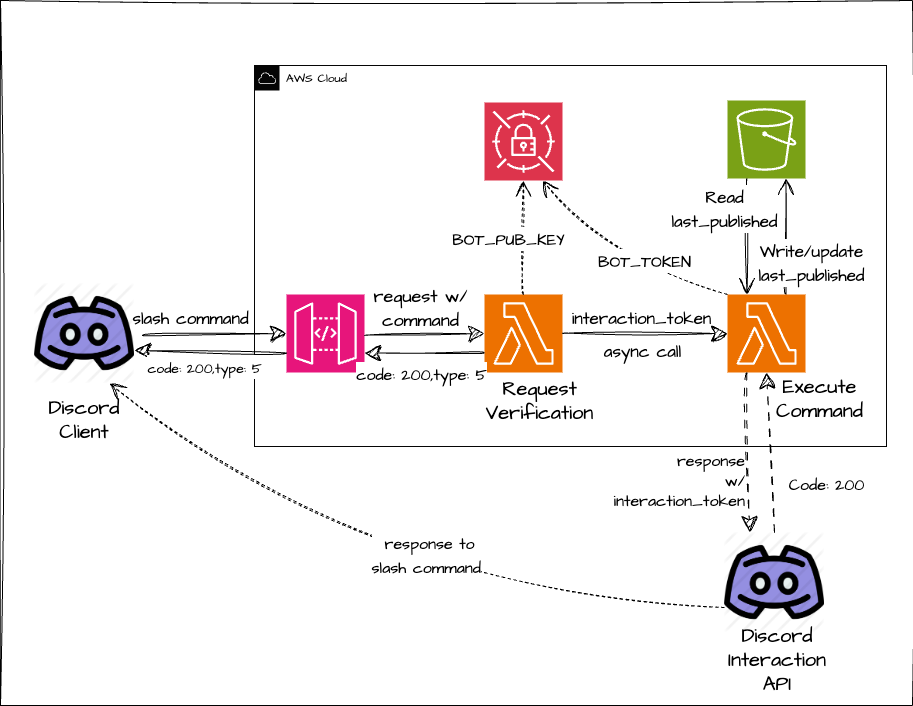
status_code: 200andtype: 5which is nothing but telling the discord client that the response isdeferred. More on discord interaction callback types here. - Trigger
ExecutionCommandlambda asynchronously once the request validation is done.
We looked into the previous blog on how verification of requests works. But before integrating it into Lambda Function there's a catch. As per discord,
you must send an initial response within 3 seconds of receiving the event. If the 3-second deadline is exceeded, the token will be invalidated.
So we are on a hard timeline for sending the first response within 3 seconds which means we need to check if the request is valid, send a response, and trigger another lambda asynchronously. To achieve that we will be using async.io to do the things in parallel.
This 3-second limit is the only reason why command execution is handled via another Lambda, deferring the response initially and sending the response later via Discord Interaction API.
Now AWS Lambda with Python, at the time of writing doesn't allow lambda_handler function as a asyn function. So we will have to create 2 async functions i.e
import asyncio
import boto3
import json
from base64 import b64decode

sm_client = boto3.client('secretsmanager')

async def verify_event(event):
    # Get the Discord public key from the secrets manager
    sm_response = client.get_secret_value(SecretId='discord_keys')
    if 'SecretString' in sm_response:
      discord_public_key = json.loads(sm_response)['discord_client_key']
    else:
      discord_public_key = json.loads(b64decode(sm_response['SecretBinary']))['discord_client_key']

    raw_body = event["body"]
    headers = event["headers"]
    signature = headers["x-signature-ed25519"]
    timestamp = headers["x-signature-timestamp"]

    # Verify the request is valid
    is_verified = verify_key(
        raw_body.encode(), signature, timestamp, discord_public_key
    )
    print("Event Verification Status:", is_verified)
    return is_verified
verify_event async function
async def run_verify_event(event):
    # Run the verify_event function and return the result
    return await verify_event(event)
async coroutine to await verify_event
def lambda_handler(event, context):
  verification_response = asyncio.run(run_verify_event(event))
  # continue with remaining logic .....
Calling within Lambda Handler
Same way triggering lambda can also be defined as an async coroutines trigger_lambda and run_trigger_lambda async coroutines and in lambda_handler, asyncio.run(run_trigger_lambda).
Another important thing is sending a response based on Discord interaction type.
For our usecase:
- type: 1, Ping from the discord servers for checking if requests are validated properly
- type: 4, Application Command i.e. when a user submits a slash command via our bot.
def lambda_handler(event, context):
  .....
  if command_type == 1 and verification_response:
            return {"statusCode": 200, "body": json.dumps({"type": 1})}
        elif command_type == 2 and (
            verification_response
            and asyncio.run(run_trigger_lambda(event)).get("StatusCode") == 202
        ):
            return {"statusCode": 200, "body": json.dumps({"type": 5})}
  ......
returning response based on command_type
The complete integrated code for VerifyRequest Lambda can be seen here.
Adding an Interaction Endpoint URL for the bot
The Interaction Endpoint URL is your AWS API Gateway REST API URL that the bot will use to send a request for running the commands or in short interact with the backend that we have implemented in the Lambda functions.
To add an interaction endpoint URL successfully on Discord Bot Portal for your bot, Discord sends 2 requests to the endpoint.
A request with a valid signature and another with a fake signature to verify if the signature validation is done properly at the endpoint that is being added.
Failure to achieve this will end up in Discord not letting you add your API Gateway URL as an Interaction Endpoint.
That's why it's important to have your VerifiyRequest Lambda ready before adding an interaction endpoint for your bot.
To create an API Gateway, let's stitch everything that we have built so far into a SAM Template and deploy it into AWS:
AWSTemplateFormatVersion: '2010-09-09'
Transform: AWS::Serverless-2016-10-31
Description: >
  aws-rss-discord-bot

  SAM Template for aws-rss-discord-bot

Globals:
  Function:
    Timeout: 45
    MemorySize: 128

Resources:
  VerifyRequestFunction:
    Type: AWS::Serverless::Function
    Properties:
      CodeUri: verify_request/
      Handler: app.lambda_handler
      Runtime: python3.10
      Architectures:
        - x86_64
      Events:
        BotCalls:
          Type: Api
          Properties:
            Path: /
            Method: post
       Policies:
        - Statement:
            Effect: Allow
            Action: secretsmanager:GetSecretValue
            Resource: "arn:aws:secretsmanager:region:account-id:secret:discord_keys"

Outputs:
  VerifyRequestApi:
    Description: "API Gateway endpoint URL for Prod stage for Verify Request function"
    Value: !Sub "https://${ServerlessRestApi}.execute-api.${AWS::Region}.amazonaws.com/Prod/"
  VerifyRequestFunction:
    Description: "Verify Request Lambda Function ARN"
    Value: !GetAtt VerifyRequestFunction.Arn
  VerifyRequestIamRole:
    Description: "Implicit IAM Role created for Verify Request function"
    Value: !GetAtt VerifyRequestFunctionRole.Arn
SAM Template with VerifyRequest Lambda and API Gateway
Once it's deployed, pick the value for VerifyRequestApi from the sam deploy output, paste it into the INTERATCIONS ENDPOINT URL in Bot > General Information section and click save.

On successful completion of the validation request sent by Discord, it will be saved. That also verifies that our request verification is working as expected.
Voila..!!! that's been a mouthful in this post.
This is it for Part 2, in the final iteration of this, we will create a Lambda for Command Execution where we will implement the logic to create a response for our commands, handle some more restrictions by discord, and finally stitch everything together to make a fully functional bot.
If you have read until here, please leave a comment below, and any feedback is highly appreciated. See you in the next post..!!! 😊


Member discussion